Monday, December 10, 2012

A photo quilt

This is what is the works for me this Monday.  I'm making this commissioned picture quilt for a family to give to their mother for Christmas.  This was a design they came up with all by themselves.  I think they did a great job.


Ruby is waiting for Santa under the Christmas tree.

Monday, December 3, 2012

December's first WIP


I'm working on a mandala design that was inspired by Tibetan mandala art.  I've really started to embrace applique, there is very little that you cannot do.  I'm still playing with colors and layout. It will just keep getting bigger until I feel like it's done or until I run out of ideas... whichever comes first.


Friday, November 30, 2012

Soccer Jersey Quilt

Well tomorrow will bring us the first day of December and things have already started to get busy around here.  Lots of jobs coming in to keep me busy.  Here is a quilt made with a little girls soccer jerseys and t-shirts.  I used flannel on the back as a request from her father who says she is always cold.  I know she will love this! 


December also means time to get out the Christmas decorations... Ruby is not at all happy that it is December and has decided to be the Grinch instead.


Until next time

Monday, November 19, 2012

Fun with Opt Art


I've been playing around with this opt art pattern.  I think I'll leave it this shape and go ahead an quilt it.  This has been a  really fun project... I know it's industrial looking, my hope is that quilting it will soften that some.


Wednesday, November 14, 2012

Rainbow wave

 
Here is a wall hanging I made today.   I like making these inbetween bigger quilt jobs, you can think them up and finish them in the same day.  ROYGBIV colors are a big favorite of mine so of course I like to play with them every now and then.


And finished...
A little trick I've learned, if the fabric starts to bunch up,  like it did on me in the center... pebble quilt it... it smashes down the bulk and in the end no one will ever know.

Tuesday, November 6, 2012

Gradient Experiment


I'm still playing with the Riley Blake Solids fat quarter bundle I got from www.fatquartershop.com.  I came up with this simple gradient experiment.  When I planned it out i liked the idea of a border to float the piece....
 
 
Finished but...
I felt like the medium gray border lessened the gradient effect so I decided to take the binding off and cut the border off...
 
This is what I ended up with... I'm not sure I made the right decision, I kinda like the original better but it's too late now to turn back.  It does fix the gradient problem but it loses something in the process.  Live and learn... on to the next fabric adventure!

Thursday, November 1, 2012

Fiesta Ware Dishes wall hanging

 
I've been cranking out wall hangings like nobody's business.  Here is one I'm calling Fiesta Dishes.  I made this with Riley Blake and Robert Kaufman Kona fabric from www.fatquartershop.com.


And finished!
 

Tuesday, October 30, 2012

Hop on scotch

Hop On Scotch a play on the game Hop Scotch.  I came up with this while trying to make a chevron design work out.  Sometimes what you end up with is nothing like what you started out to make.  Not always a bad thing :)


Hard to see my pebble quilting.
 

Sunday, October 28, 2012

Finishing up some UFO's


Playing with geometrics and solids.  I plan to border and quilt this little wall hanging today if I can find the time.


Kodachrome, my Double Stairway to Heaven is finished!

 
I tried a zig-zag free motion quilting on this, not sure I love it but bam, it's done.

Sunday, October 14, 2012

Playing Hooky - Design Wall Monday


Hooky Junk Quilt
I received these fat quarter bundles from www.fatquartershop.com and decided to make up a pattern to tie them together. I used a Kaffe Fassett Fire fat quarter bundle and a Riley Blake solids fat quarter bundle. I drew a template of one quarter of the block, stitched the quarters together to make the hooky square. I used some fusible to help hold it down while I blanket stitched around it.


Stay tuned...
 
 
The top is finished... now to quilt it.
 
 
And Done!


Wednesday, October 10, 2012

Come On Get Happy!

A tutorial of sorts...


Come On Get Happy

When the sewing "work"slows down I like to use my free time to sew the kinds of things that "I" really like sewing. I have an unrealistic amount of stash fabric so I came up with this little number to use up some of that extra fabric that is taking up space in my sewing studio.
 

I started with cutting 12-1/2" squares of white fabric. I then created my templates. I made my large teardrop template based on a 10" circle then folded the paper in half and drew the teardrop point freehand and cut the paper to make a usable template. It measures 13" from top of the circle to the tip of the teardrop.  Make a 7-3/4" circle template and a 6-1/4" circle with a 3" hole in the center.  Make a 5" circle with a 3" center hole.

To begin: Trace around the teardrop template and cut the fabric out into a teardrop shape. Center and applique the whole teardrop with a blanket stitch to the 12-1/2" block. Using a 7-3/4" circle template, center template over the appliqued teardrop and trace around it with a washable marker. Carefully poke a hole in the top colored fabric only and cut that center piece of the fabric out. Sew with a blanket stitch around the inside of the teardrop.


For the inner circle template cut a 6-1/4" circle with a 3" donut hole center. Fold that in half to make it easier to cut around. Place and pin the fold of the template on the fold of the fabric and cut both of the arcs to make your fabric ring. I used a tone on tone fabric for the teardrop and a little bit busier tonal fabric for the center ring.
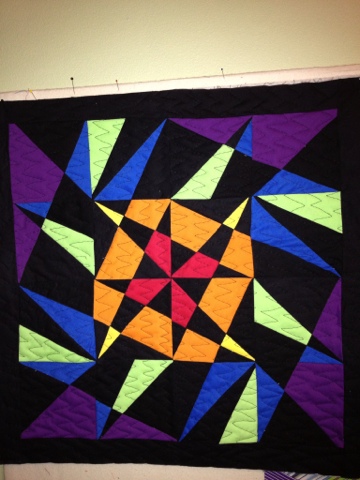

After completing the blocks piece the top together and add 5 circles that measure 5" with a 3" center hole at the intersections as seen below. Again, blanket stitch the inside of the ring first then the outside, this helps to keep it nice and flat.  I added white sashing around each block cut at 1-1/2".  I floated the quilt top with 3" of an inner white border then I added a 2-1/2" mitered border with some of the fabrics in the quilt and finished it off with another 2-1/2" white final border and bound it in white. I did an allover spiral free motion quilting pattern. I named it Come On Get Happy because it reminded me a little of the Partridge Family birds from my childhood and this quilt makes me HAPPY!


Tuesday, September 25, 2012

Color Wheel - WIP


For my birthday, I received this quilt pattern "Stair Way to Heaven" from my Aunt.  She got if from this website http://www.romanianquiltstudio.com/english/patterns.htm.  It was super easy, really fun to make and the construction goes very quickly.  I decreased her template size by 20% to make it smaller then I appliqued a tiny 80% smaller one to the center to give it some extra depth.  It is still a work in progress as I'm not sure what I'll do with it next, should I make a quilt or a big wall hanging?

Friday, September 14, 2012

My Favorite Quilt

Santa Fe Quilt
 
I designed this quilt for P&B Textiles using their upcoming line Terra.  I just love this fabric and this quilt.  I have always wanted to make an "Indian Blanket" quilt and when I saw this fabric line I knew  this was my chance!


Sunday, August 26, 2012

Vintage Necktie Bicycle Seat Cover

Vintage Necktie Bicycle Seat Cover
As you know, I've been having fun with all these vintage neckties that I inherited from my Great Aunt Jean.  Over the weekend I decided I'd try and sell my 1978ish Peugeot Grand Sport 10 speed but the seat was a little chewed up.   I began to research ways to make a cover myself and  I found this video http://www.youtube.com/watch?v=Du8fyMRnZug ....the rest is history! 
 Here is what I made!


Monday, August 20, 2012

My Design Wall Monday

Here are pictures of the blocks I am making for a quilt for P & B Textiles with their gorgeous new line called New Traditions.

Windblown Squares

I'm also excited to post this sneak peek of my quilt Windblown Squares that will be featured in the upcoming Oct/Nov 2012 issue of The Quilter Magazine.  I designed and pieced this quilt and my twin sister Barbara Hanni did the machine quilting.  It was a fun collaboration, I can't wait to see the magazine in person!

Tuesday, August 7, 2012

More Fun With all These Crazy Neckties

Doggie Neckties

With all these neckties I have inherited I've had fun finding ways to use them up.  Neckties are so long that you really have two ties in one, a big end and a little end.  I have cut off the little end to the "right" length for the dog and then added an inch or so to account for the distance around the collar.  I then just zig- zagged across and put in a couple of darts on either side to make it look like it has been knotted.  Super easy, quick and fun!  What else can I make with almost 200 vintage neckties?

Wednesday, August 1, 2012

Sailboat Quilt


Sailboat Quilt

Here is a commissioned quilt for a sick sailor.  His daughter and I came up with this simple design and I had a good time fancying it up with the quilting.